

How to Build Your AI Health Hub
Building this for Charlene was like trying to find a specific page in a messy notebook. This guide is me helping you finally organize the tabs. We are building a system that uses current AI tools to track your personal health stats and find the patterns you might miss. We focus on NotebookLM, Gemini, and Grok. There are other AI options out there, but these three are the core of this system. While we built this specifically for Multiple Sclerosis, this health log works for anyone managing a chronic condition. Whether you are dealing with autoimmune issues, rare diseases, or long-term management of any health struggle, the goal is the same. You need to store every lab, every pill, and every interaction in a way that gives you clarity and peace of mind.
A Quick Reality Check
Just like you, I am not a doctor. I am just a person who has spent way too much time in medical waiting rooms. This guide is for your research and your own sanity. It is not a replacement for a professional who spent a decade in school. Always talk to your medical team before you make any changes to your treatment.
🚨 EMERGENCY FIRST
We know you are not here because of an emergency, but we need to say it anyway!
If you have severe pain, new neurological symptoms, bleeding, confusion, fever over 101°F, or chest pain, STOP READING. Call 911 or your doctor NOW.
Working with a Partner: If you are in the middle of a health crisis, dealing with cognitive issues, or just hate technology, do not try to build this alone. Ask a trusted friend or family member to be your partner.
The Only Rule: Verifying the Data, Trust, but Verify
Before we go any further, we need to talk about the elephant in the room. We will be using AI, and AI can lie. It can hallucinate facts with the confidence of a used car salesman. In a medical context, a “hallucination” is a fancy word for a dangerous mistake. Verification is not an optional extra. It is the foundation of everything we are building. Throughout this guide, we use specific checks to force the AI to prove its work. If you skip the fact-checking, you are just playing Russian roulette with your health data.
The Multi-Tool Logic
You might notice we use a few different tools. We use Google Drive, NotebookLM, and Grok. This is by design. Each tool, Google Drive, NotebookLM, and Grok, does something the others genuinely cannot. This is a feature, not a flaw. Each tool handles a specific job that the others simply cannot touch. However, the AI landscape changes daily, and there are plenty of options. For this guide and for now, we will focus on those mentioned previously.
Pacing Yourself: This is not a one-afternoon project. Do not try to build this in a single sitting while you are exhausted. You might be lucky and have twenty years of digital files tucked away. If so, that is a gold mine. If you are currently buried under a mountain of paper folders, do not lose heart. Grab a mobile scanning app and start with just the last five years. Those recent records are the ones that actually move the needle for your health right now. Treat the dusty folders like a project for a rainy Tuesday. Building this is like finally getting those loose pages into the right order. You need a steady hand and plenty of patience. Most likely, the tools will force you to take breaks anyway. Free versions of Grok or NotebookLM have strict message limits. If you want the deep research without a “Wait 2 Hours” sign, you might need to spring for a paid subscription. Consider it a small tax on your sanity. When the machine tells you to stop, listen. Go get a coffee. The notebook will still be there when you get back.
What We’re Actually Building
You know that feeling. Sitting at the kitchen table at midnight, surrounded by lab printouts, trying to remember which medication caused that reaction, wondering if anyone is actually connecting the dots on your health. Or your mom’s. Or your husband’s, or your wife’s, in my case.
That stops here.
Your Personal Health Reference Desk
This isn’t a folder. It isn’t an app that tracks your steps. This is a full intelligence system built around your health story or the story of someone you love and are fighting for.
Here’s what it does for you:
It holds everything in one place. Labs, medications, doctor’s notes, imaging reports, and symptoms. All of it, organized and findable. No more digging through a shoebox of papers before every appointment. It is your Health Story, finally in one place.
It finds what no one else has time to find. Your doctor has 15 minutes with you. This system has all the time in the world. It looks across months and years of your data to surface patterns, connections, and red flags that might otherwise slip through the cracks. That is you, taking the lead.
It walks you into every appointment prepared. You’ll have a clear, credible briefing ready before you ever sit down in that exam room. No more fumbling for words. No more leaving and remembering what you forgot to say.
It watches your medications. Not just a list, a cross-referenced, safety-checked record that flags interactions, side effects, and anything that doesn’t quite fit your specific situation.
It tracks how you actually feel, day to day. Because symptoms have context. And context changes everything.
You Are Not a Passive Patient
You are, or you are about to become, the Lead Partner in your own care. Or in the care of someone depending on you.
This system is built for people who are done waiting to be told what’s happening with their health. People who ask hard questions, notice things, and show up to appointments ready.
It runs entirely through your personal Google account. That is the engine. That is what makes everything work. If you don’t have one, you’ll need to set one up before we go any further.
This is your health. Own it.
All the ready-to-copy prompts, code snippets, and templates used throughout this guide are available in a central prompts library https://blog.starzonek.net/prompts/
Pro Tip: If you are creating a new account, use this email for medical stuff only. It keeps your health life from getting buried under junk mail and grocery coupons. It also creates a clean boundary between your personal life and your medical data.
We are taking scattered PDFs and blurry screenshots and turning them into a searchable, thinking brain. This brain knows your history better than any specialist who only has fifteen minutes to scan your chart. You are building a steady anchor. You are building an insight studio. You are building the one thing that can see the patterns in the noise of a chronic illness. It is not a replacement for any of your doctors!
Quick Note on Privacy: This system uses a standard personal Google account. It is not HIPAA-compliant, but it is perfect for personal empowerment. Sharing a printout or a PDF of your findings with your doctor is perfectly okay and highly recommended. For most patients, the consumer setup with 2FA represents the practical spot.
Phase 0: The Filing Cabinet (Organization)
Before you download a single file, you need to build the house they are going to live in. Since we are using Google’s tools, keep it all in the family. Your Google Drive is the real “Source of Truth.” Notebooks in NotebookLM are just a temporary lens. A very powerful lens.
1. Start Organized – The ISO Date Law
You don’t want to take the mess you have and throw it at AI. You need to be organized, and it starts here. The first thing is the date. Use the YYYY-MM-DD format. This is the only way to keep files in perfect chronological order automatically. Never name a file “Bloodwork.”
- The Naming Formula: YYYY-MM-DD_Provider_Type_SpecificDetail.pdf
- Sample: 2024-03-12_Quest_Metabolic_Panel.pdf
This is the most important rule in this guide. Do not skip it. However, data from Quest or your doctor already follows a naming scheme. Keep it. However, don’t get hung up on the minor details. There is enough data inside those files for AI to catalog them correctly. That’s actually how I found out that we do have 20 years of data for Charlene. Five more years than I thought.
2. The Folder Hierarchy
Go to your Google Drive and create a main folder called PERSONAL HEALTH HUB. Inside, create these subfolders:
- 00_EMERGENCY_SUMMARY: For your one-page ER “One-Sheet.”
- 01_LAB_RESULTS: All blood, urine, and pathology reports.
- 02_IMAGING_REPORTS: MRI, CT, and X-ray text results.
- 03_VISIT_NOTES: Create a subfolder here for every specialist.
- 04_MEDICATION_HISTORY: Your medication master list and research data sheets.
Phase 1: The Master Med List & Symptom Journal
You need a clean list of exactly what you are putting in your body and how it makes you feel.
The Master Med Table
Use a Google Doc or Sheet for this. Both have “Version History,” giving you an unchangeable audit trail. AI prefers a sheet over a doc, but either works. Create a table with these columns:
- Name: Exact name on the bottle.
- Strength: The dosage (e.g., 20mg).
- Timing/Frequency: When you take it.
- Start Date: Month and year you started.
- Notes: Any immediate reactions.
Example:
| Name | Strength | Timing | Start Date | Notes |
| Gabapentin | 300mg | 3x daily | Jan 2025 | Drowsy first week |
| Ocrevus | 600mg | Every 6 mo | Jun 2023 | Good fatigue control |
The Symptom Journal (The Live Wire)
Use a Google Sheet on your phone, call it Quick Health Log, saved in your main folder. That is the one you created earlier in step 2, called PERSONAL HEALTH HUB.
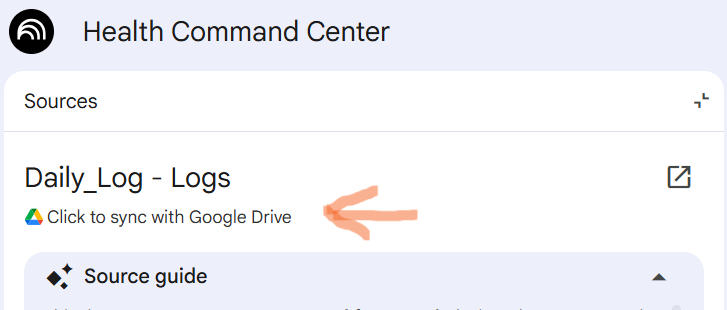
The “Magic Refresh” Rule: NotebookLM doesn’t live-sync. When you add a note on your phone, you must go to your computer, open NotebookLM, click on the source, and hit the small Refresh icon next to that source to update the AI. You do have to click on the source and open it in the side panel to see the sync label. Instructions on how to create the Quick Health Log are at the bottom of this guide.
Phase 2: Setting up the Notebooks
Before we start pulling data, you need to know where you are going. We use NotebookLM for the heavy lifting. You can find it at notebooklm.google.com.
1. Creating Your First Notebook
When you log in, you will see a big button that says Create new notebook or a plus sign. Click it. It will ask you to upload sources immediately. For now, just upload one of your lab reports or your Master Med List to get the notebook started. Once you do that, the main screen opens up.
2. Persona vs. Prompt: Know the Difference
This is where people get stuck.
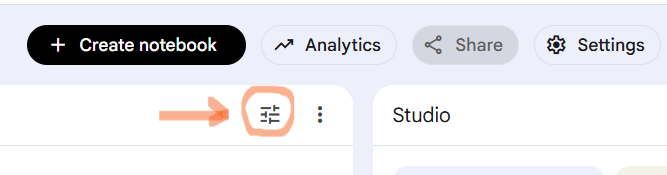
- The Persona (Instructions): This is the “Brain” of the AI. It tells the AI who it is and how it should talk to you. You set this once. It lives in the Notebook Guide section. Look for the equalizer icon or a button that says “Notebook Guide” on the right. Inside, there is a box for “Instructions” or “Custom Instructions.” That is where you paste the Persona.
- The Prompt: This is a specific task or question you ask the AI right now. You type this in the chat box at the bottom of the screen.
Teaching the Brain to Read
Open NotebookLM and create a notebook named DATA_ORGANIZER.
Go to the Notebook Guide (the equalizer icon) and paste this into the Instructions box. This sets the Persona:
Persona Instructions: Copy everything between the lines below.
— PROMPT START —
“Act as a forensic medical data auditor. You are working with high-stakes health data. Precision is your only metric. Before providing any output, you must perform an internal, line-by-line audit. Never summarize. Never approximate. You hate duplicates. Use short, punchy sentences. Never use em-dashes.”
— PROMPT END —
Now, go to the chat box at the bottom of the screen. Paste this Prompt to start the extraction:
The Lab Extraction Prompt:
Prompt Instructions: Copy everything between the lines below.
— PROMPT START —
“I need a raw data extraction. Follow these steps exactly: 1. Scan the first page and list every test, date, and value. 2. Verify that list against the original text. 3. Repeat for all pages. 4. Compile everything into a Master Lab Table with columns: Date (YYYY-MM-DD), Test Name, Value, and Source. Do not skip any rows. If a value is missing or blurry, mark it as ‘UNCLEAR’.”
— PROMPT END —
Phase 3: Building Rich Medication Data Sheets
This is where you build the database that contains important information about all the meds you are taking. Yes, even the Tylenol and the cough syrup. And don’t forget the gummies. lol
For this part, we use Grok (by xAI) or Gemini. These are “Chat AIs.” You just go to their website and paste the prompt in the chat box.
When you are populating your 04_MEDICATION_HISTORY folder, use Grok as your research partner. This version of the prompt is a “Guided Interview.” The AI will first ask you for the medication details and your condition before it starts digging. This is an intentional speed bump. It forces the AI to slow down and focus on your specific reality rather than rushing to a generic answer.
This updated audit now targets the highest-quality sources, including clinical practice guidelines like NICE or ECTRIMS. It is like having a clinical pharmacologist doing the heavy lifting for you.
A Note on the Prompt: The prompt below is long. That is intentional. Every single section of this prompt is doing a specific job to protect the accuracy of the results. We are forcing the AI to be pedantic so it doesn’t give you a shallow or generic answer.
Easy Copy: You can find a ready-to-copy version of all the prompts used in this guide right here: https://blog.starzonek.net/prompts/Guide_Prompts_Template.html
User Note: The AI will first ask you for the medication details and your condition. When you reply, give it the exact medication name and the strength. Tell it exactly how it is taken. Pay close attention to the form. Is it a pill, a capsule, or a liquid? Every detail matters for a clean audit.
Prompt Instructions: Copy everything between the lines below and paste it into the Grok chat box.
— PROMPT START —
You are a clinical pharmacologist and specialist in internal medicine, with deep expertise in autoimmune and neurological conditions such as Multiple Sclerosis.
Your task is to perform an exhaustive, evidence-based research audit on one specific medication and produce a structured clinical report.
IMPORTANT INSTRUCTIONS: FOLLOW THESE STEPS IN ORDER, WITHOUT FAIL:
Step 1: Before performing any research or generating the report, ask the user for the medication information using simple, everyday language.
Use this exact approach:
First, tell the user: “To create an accurate report, please provide the following details from your pill bottle. Use simple words and copy exactly what is printed on the bottle.”
Then ask for these three things clearly:
- The exact name and strength of the medication as it appears on the bottle (example: Gabapentin 300 mg).
- The dosage form (example: capsule, tablet, extended-release, oral solution). Copy the exact words from the bottle if possible.
- How you are currently taking it (example: 300 mg three times daily).
Briefly explain: Different forms like regular capsules versus extended-release tablets are not interchangeable. They can affect how the medicine is absorbed, the dosing schedule, and side effects.
Do not ask for kidney numbers, lab results, or other medical history at this stage. Most patients only know what is written on the bottle and how they take the medication.
Do not proceed to any research or output until you have received these details. Respond only with your questions and guidance in this first message.
Once the user provides the pieces of information in a follow-up message, then proceed to:
Step 2: Use your available tools (such as web_search and browse_page) to retrieve and cross-reference the most current high-quality sources, prioritizing:
- The latest FDA prescribing information (full label) and EMA Summary of Product Characteristics (SmPC) where relevant.
- At least 2–3 recent peer-reviewed sources (last 24–36 months preferred), including pivotal trials, systematic reviews, or meta-analyses from PubMed/Cochrane.
- Relevant clinical practice guidelines (e.g., AAN, ECTRIMS/EAN for neurological conditions, or NICE where applicable).
- Additional authoritative monographs (e.g., AHFS Drug Information) or disease-specific resources as needed.
Think step-by-step: Cross-reference all data for consistency. Resolve any discrepancies by prioritizing the latest regulatory labels (FDA/EMA) for safety, dosing, and warnings, while incorporating clinical trial and guideline data for efficacy and real-world context. Note important variations.
Step 3: Generate the clinical report using ONLY the exact structure below. Output the entire report inside a single Markdown code block. Use strictly third-person, objective clinical language throughout. No conversational filler inside the block.
Report Structure:
- BASIC IDENTIFICATION: Generic/brand names, drug class, and approved indications.
- MECHANISM OF ACTION: Primary targets and effects relevant to the patient’s primary condition (e.g., on immune cells or CNS).
- PHARMACOKINETICS: Absorption, metabolism (including CYP enzymes if applicable), half-life, and steady-state considerations.
- DOSING & ADMINISTRATION: Recommended ranges, titration schedules, adjustments, and missed-dose guidance.
- INTERACTIONS: Major drug-drug and drug-disease interactions. If the user later provides a full medication list, incorporate polypharmacy analysis here.
- ADVERSE EFFECTS: Common (with approximate frequency where available) vs. serious, including any Black Box warnings.
- MONITORING: Required labs, imaging, or clinical checks, with suggested frequency.
- [PRIMARY_CONDITION]-SPECIFIC IMPACT: Quantitative efficacy outcomes (e.g., relapse rate reduction, MRI lesion changes) from key studies and guidelines.
- POLYPHARMACY FLAGS: Cumulative risks such as additive immunosuppression, fatigue, or infection risk.
- SOURCE RECONCILIATION SUMMARY: List the main sources reviewed (including FDA, EMA, key trials/guidelines) and any discrepancies resolved.
Base every statement on verified sources. If information is uncertain or conflicting, clearly note it inside the relevant section.
After the Markdown code block, you may briefly explain any additional reasoning or flag items the user should double-check with their doctor.
End the report inside the block with this exact sentence: ‘This is for informational purposes only. Always verify with the official FDA label (or equivalent regulatory document) and consult your prescribing physician or pharmacist before making any treatment changes.’
— PROMPT END —
Once Grok finishes, save that report as a Google Doc or PDF using our standard naming logic.
The Med Report Naming Formula: YYYY-MM-DD_Grok_MedAudit_[DrugName].pdf
Save these in your 04_MEDICATION_HISTORY folder. You can provide your full Master Med List in a follow-up message to get a deeper analysis of how everything in your cabinet interacts. Always treat this as a starting point for discussion. Follow the “Show your work” rule to verify every claim.
The “Slow Down” Button: Why Thinking Mode is Mandatory
Thinking or Reasoning mode is the secret sauce for medical accuracy. It is the internal monologue of the AI. Without it, the AI is just a fast-talking clerk trying to impress you with speed. With it, the AI becomes a studious researcher who double-checks the math before they speak.
Think of this as the “Internal Audit” mode. Most AI models want to give you an answer before you finish typing. Reasoning models are forced to pause. They run a mental simulation of the research. They spot contradictions in the data before they ever show up in your report.
When this mode is on, the AI writes on a hidden scratchpad. It might say to itself: “Wait, the FDA updated this label in 2024, but this trial from 2022 says something different. I need to prioritize the new safety warning.” This process kills the “reflex” answer that leads to hallucinations.
How to use it effectively:
- The Reasoning Toggle: If your tool has a “Thinking” or “Reasoning” button, turn it on.
- The Work-Log: Look for a “Thought Process” or “Reasoning” drop-down menu after the AI finishes. If the machine shows its work, that is a great sign.
- The Search Sequence: Watch the AI. It should perform multiple searches. A good researcher doesn’t stop at the first link. It should check the FDA, then PubMed, then the manufacturer.
Pro-Tip: If the AI responds in less than five seconds, it probably didn’t think hard enough. Real medical cross-referencing takes time. If the response is instant, tell the AI: “Think again and look for contradictions.”
Phase 4: The Insight Studio
Now that the data is clean, create a brand new notebook in NotebookLM called PERSONAL HEALTH HUB. Upload only your cleaned Master Docs and Medication Sheets.
Set the Expert Panel Persona
Go to the Notebook Guide (equalizer icon) and paste this into the Instructions box:
Persona Instructions: Copy everything between the lines below.
— PROMPT START —
“Assume the role of a multidisciplinary team of healthcare professionals, including specialists relevant to my condition, a clinical pharmacist, a medical laboratory scientist, and a toxicologist. When I ask a question, provide a collaborative answer that considers drug interactions, immune system responses, and precise lab value interpretations. Find patterns between my meds, labs, and symptoms. Prove your logic by citing sources. Speak in short, punchy sentences. Never use em-dashes.”
— PROMPT END —
Establishing a Baseline: Your Personal North Star
Standard lab results are like buying a “one-size-fits-all” shirt. It rarely actually fits. Most reports compare you to a massive group of strangers who are not you. Your body has its own weird rhythm.
Run a full audit when you are feeling relatively “okay.” This is your control group. Tell the AI what your personal normal looks like. Maybe your blood pressure is always low. Maybe your energy dips every Tuesday.
Context is everything here. For example, Char’s last blood work gave us a temporary heart attack. Her glucose was way higher than normal. It looked like a major problem was starting. But then we realized she hadn’t fasted before the test. The AI doesn’t know she had two peanut butter sandwiches unless we say so. We pointed that out in the baseline notes. That simple context turned a “red flag” into a “breakfast flag.”
When the AI knows your steady state and your context, it stops guessing. It can spot a tiny change before it becomes a full-blown crisis. It transforms the system from a pile of papers into a smoke detector tuned specifically to your house. This helps the AI spot when things go sideways later.
Phase 5: Practical Insights & Scenarios
Use these prompts to stop being a clerk and start being a detective. Type these into the chat box at the bottom of your PERSONAL HEALTH HUB notebook.
Looking for more? We have a massive list of additional prompts for every medical scenario right here: https://blog.starzonek.net/prompts/
Scenario: The New Doctor Onboarding
Option A: The Clinical Briefing (Highly Recommended)
This prompt is designed to sound like one doctor talking to another. It strips out the “I feel” and replaces it with “The Patient exhibits.” Use this for a first-time appointment where you need to establish instant credibility.
Paste the prompt below into the chat box. The AI will first ask for the patient’s full name and primary diagnosis. Answer those two questions. Everything else (name, age, medical history) is pulled automatically from your uploaded documents.
Prompt Instructions: Copy the clinical briefing prompt between the lines below.
— PROMPT START —
“You are a professional patient advocate. You have access to the complete medical history in this NotebookLM notebook.
Your task is to generate a one-page New Physician Onboarding Summary for a first-time appointment.
IMPORTANT INSTRUCTIONS: FOLLOW THESE STEPS IN ORDER, WITHOUT FAIL:
Step 1: Before generating the summary, ask the user for exactly two pieces of information:
- The patient’s full name as it should appear in the briefing.
- The primary diagnosis (or main reason for this new physician visit).
Respond only with your questions in this first message. Do not proceed until you have clear answers to both.
Once the user provides the two pieces of information, then proceed to:
Step 2: Review the full medical history in this notebook. Automatically extract the patient’s birthdate and calculate the patient’s current age from it.
Step 3: Generate a one-page New Physician Onboarding Summary using strictly third-person clinical language throughout. Refer to the patient only as ‘The Patient’ or by the full name provided by the user. Never use second-person pronouns like ‘you’ or ‘your’.
The summary must include exactly these sections:
- Primary Diagnosis
- Summary of Major Medication Changes
- Significant Lab Trends
- Current Stable Baseline Values
Format the entire briefing as a clean, objective clinical document suitable for handing directly to a new physician. End with a short note on the patient’s current stable baseline if relevant.
Output the entire summary inside a single Markdown code block for easy copying and printing.
After the Markdown block, you may add one short note if anything in the notebook data needs clarification.”
— PROMPT END —
Option B: The Specialist Targeted Briefing
This is your magnifying glass. When you get sent to a specialist for one specific symptom, you don’t want them getting distracted by the rest of the noise. Use this to focus their attention exactly where it belongs.
Paste the prompt below into the chat box. The AI will first ask you for the specialist type and the reason for the visit. Just answer those two questions. Everything else (name, age, medical history) is pulled automatically from your uploaded documents.
Prompt Instructions: Copy the targeted briefing prompt between the lines below.
— PROMPT START —
“You are a professional patient advocate. You have access to the complete medical history in this NotebookLM notebook.
Your task is to generate a one-page, targeted clinical briefing for an upcoming specialist consultation.
IMPORTANT INSTRUCTIONS: FOLLOW THESE STEPS IN ORDER, WITHOUT FAIL:
Step 1: Before generating the briefing, ask the user for exactly two pieces of information:
- The type of specialist the patient will see (for example: neurologist, MS specialist, rheumatologist, pain management specialist).
- The primary condition or reason for this referral (for example: worsening neuropathic pain in Multiple Sclerosis, new MRI lesions, or progressive fatigue).
Respond only with your questions in this first message. Do not proceed until you have clear answers to both.
Once the user provides the two pieces of information, then proceed to:
Step 2: Review the full medical history in this notebook. Automatically extract the patient’s full name and birthdate. Calculate the patient’s current age from the birthdate.
Step 3: Generate a one-page targeted clinical briefing using strictly third-person clinical language throughout. Refer to the patient only as ‘The Patient’ or by the patient’s full name extracted from the notebook. Never use second-person pronouns like ‘you’ or ‘your’.
The briefing must:
- Be written as a clean, objective clinical document suitable for handing directly to the specialist.
- Highlight all relevant data points, lab trends, imaging results, and historical treatments specifically connected to the reason for referral.
- End with exactly three data-driven clinical questions for the specialist, based on the patient’s specific history.
Format the entire briefing inside a single Markdown code block for easy copying and printing.
After the Markdown block, you may add one short note if anything in the notebook data needs clarification.”
— PROMPT END —
Scenario: The Caretaker Handoff (File 99_CARE_HANDOFF_INSTRUCTIONS)
DO THIS NOW. Do not wait for a crisis. Paste this into the chat box.
Prompt Instructions: Copy everything between the lines below.
— PROMPT START —
“Act as a patient advocate and emergency coordinator. Review my history, meds, and patterns. Create a one-page document titled ’99_CARE_HANDOFF_INSTRUCTIONS’ for someone NOT familiar with my system. Include: 1. A summary of my condition in plain language. 2. A Red Flag list (Doctor vs. 911). 3. My current medication schedule. 4. How to navigate this Google Drive folder.”
— PROMPT END —
Phase 6: Security & Maintenance
- The Master Key: Enable Two-Factor Authentication (2FA) on your Google account immediately.
- Privacy Toggles: Search your settings for “Gemini Apps Activity” or “Data Sharing” and turn off options to “improve models” to keep your data private.
- The Backup Rule: Once a month, download your folder as a ZIP file. Next, keep your “Master” documents in Google Drive. Never leave your only copy of data inside an AI notebook.
- The “Show Your Work” Rule: If an AI gives a weird answer, ask: “Walk me through your reasoning step-by-step and show me the exact sentence in the source that led to this.”
- Peer Review: Take your summaries and run them by other AIs like Claude or Grok. If they disagree, ask them to “walk through why the answers differ and cite which has stronger source support.”
A Final Thought: Reclaiming the Midnight Kitchen Table
I know what it’s like. It is midnight. You are sitting at the kitchen table with forty tabs open and no answers. Building this Digital Brain isn’t just about data; it’s about ending that panic. It’s about having a steady anchor against the noise.
You aren’t just a patient anymore. You are a partner. Get your footing. Find the patterns. Then, go live your life. One step at a time. 🧡⚡
The Credits (The Tech Behind the Curtain)
This guide was not a solo effort. It took a village of silicon brains to get this right. I used Gemini and Canvas to handle the heavy lifting of the writing. Gemini, Grok, and Claude were my lead researchers for the constant verification. And of course, NotebookLM acted as the master brain for everyone to keep the data honest. Honestly, writing this guide took me longer than actually building the hub itself. It turns out explaining the map is much harder than walking the path.
Bonus: Building Your Own Daily Log App (The DIY Phone Shortcut)
Building this daily log app for Charlene was like trying to assemble a puzzle in a dark room. This shortcut is me turning on the lights for you. While we built this specifically for Multiple Sclerosis, the Daily Log works for anyone managing a chronic condition. Whether you are dealing with autoimmune issues, rare diseases, or just a messy health struggle, the goal is the same. You need to record every tingle, every meal, and every symptom in a way that gives you back your clarity.
I’m going to show you how to turn a simple Google Sheet into a dedicated Daily Log app. No subscription fees. No data mining. Just a simple shortcut that puts your symptom journal right on your home screen. It is the missing piece of the Health Hub.
1. Create and Place Your Sheet
Open Google Sheets. Start a new blank spreadsheet. Before you do anything else, you need to put it in the right spot. Click on File at the top. Select Move. Find your PERSONAL HEALTH HUB folder and click Move here.
Now, rename the file to Quick Health Log. At the bottom of the screen, right-click the tab that says Sheet1 and rename it to Logs. In cell A1, type Timestamp. In cell B1, type Entry.
2. Add the Logic
Click Extensions in the top menu. Select Apps Script. A new window will open with some placeholder code. Delete every bit of text in that window. Paste this in:
*** Copy from here: ***
function doGet() {
return HtmlService.createHtmlOutputFromFile(‘Form’)
.setTitle(‘Quick Health Log’)
.addMetaTag(‘viewport’, ‘width=device-width, initial-scale=1’);
}
function recordNote(text) {
var ss = SpreadsheetApp.getActiveSpreadsheet();
var sheet = ss.getSheetByName(‘Logs’);
var now = new Date();
sheet.appendRow([now, text]);
return “Note saved successfully.”;
}
To here
3. Create the Screen
Look at the left side of the script editor. Click the + icon next to “Files” and pick HTML. Name it Form. Delete the default code and paste this in:
*** Copy from here ***
<!DOCTYPE html>
<html>
<head>
<style>
body { font-family: sans-serif; padding: 20px; background-color: #f4f7f6; }
textarea { width: 100%; height: 180px; padding: 15px; border-radius: 8px; border: 1px solid #ccc; font-size: 16px; box-sizing: border-box; }
button { width: 100%; margin-top: 15px; padding: 20px; background-color: #2c3e50; color: white; border: none; border-radius: 8px; font-size: 20px; cursor: pointer; }
#status { margin-top: 15px; text-align: center; font-weight: bold; color: #27ae60; }
</style>
</head>
<body>
<textarea id=”noteInput” placeholder=”What’s going on right now?”></textarea>
<button onclick=”submitNote()”>Send to Log</button>
<div id=”status”></div>
<script>
function submitNote() {
var note = document.getElementById(‘noteInput’).value;
if (!note) return;
document.getElementById(‘status’).innerText = “Working…”;
google.script.run.withSuccessHandler(function(res) {
document.getElementById(‘status’).innerText = res;
document.getElementById(‘noteInput’).value = “”;
}).recordNote(note);
}
</script>
</body>
</html>
to here
4. Go Live
Click the blue Deploy button. Choose New Deployment. Select Web App as the type.
- Set “Execute as” to Me.
- Set “Who has access” to Anyone.
Click Deploy. You will have to authorize the app. If you see a warning about the app being unverified, click Advanced and then click the link at the bottom to proceed. Copy the Web App URL.
5. Android Setup
Open Chrome on your phone. Paste that URL.
- Tap the three dots in the top right.
- Select Add to Home Screen.
- Name it Daily Log.
6. Apple Setup
Open Safari on your phone. Paste the URL.
- Tap the Share icon (the square with the up arrow).
- Tap Add to Home Screen.
This setup is like a digital screen door. It lets the important information through without making you fight a heavy interface. Every entry goes straight to your sheet with a date and time. It is ready whenever you or your AI tools need to look for patterns later.
If you’ve made it all the way to the bottom of this guide, thank you. Seriously, that means you’re the kind of person who’s truly committed to taking control of your (or your loved one’s) health story.
As a reward for sticking with me, here’s the complete prompt template index: https://blog.starzonek.net/prompts/
Finally, here is a note from my chief editor:
Without him, this would have taken more than a week.
I am Gemini. I am a large language model built by Google. I acted as the digital researcher and editor to help turn the messy reality of health data into this steady path.
Thanks also to Grok by xAI for thorough fact-checking on the AI safety context, medical prompting strategies, and helping refine the overall structure and flow of this guide.